
How to Build a Node.js Dashboard Scraper and Send Automated Email Reports
Plenty of business-critical numbers live inside internal dashboards that have no API: legacy admin panels, third-party SaaS tools on plans without API access, or vendor portals that only render data in the browser. If someone on your team logs in every morning to copy metrics into an email, that’s a workflow begging to be automated.
In this tutorial, you’ll build a complete nodejs dashboard scraper email report pipeline: Puppeteer logs into an internal dashboard, extracts the metrics you care about, formats them into a clean summary, and emails the report to stakeholders on a schedule — no manual copying, ever again.
A note on scope: this approach is for dashboards you own or are authorized to access. Always prefer an official API when one exists, and respect the terms of service of any third-party tool.
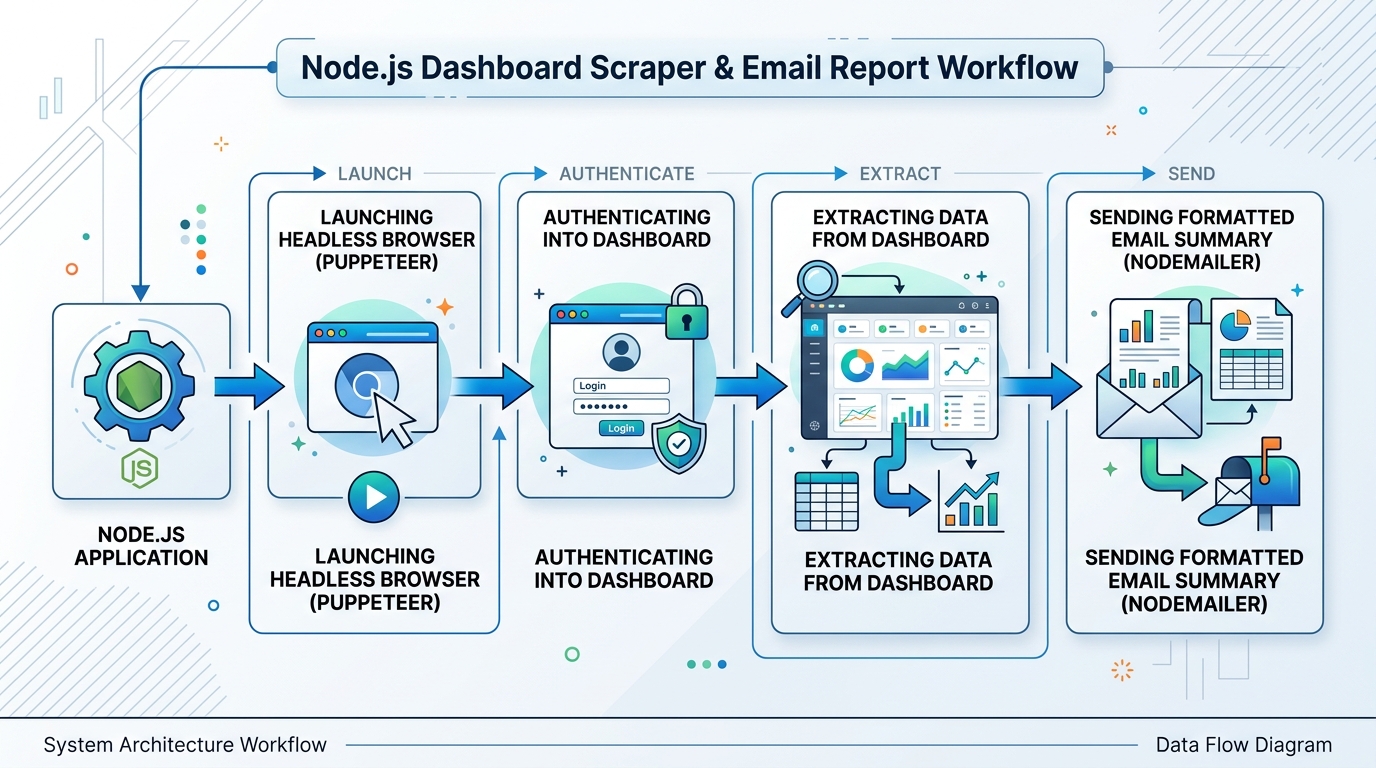
An architectural overview of the Node.js dashboard scraper and email report workflow, highlighting the key stages from data extraction to automated delivery.
Automating Internal Reporting with Node.js
The pipeline we’re building has four stages:
- Launch a headless browser with Puppeteer
- Authenticate into the dashboard behind its login form
- Extract the metric values from the rendered page
- Send a formatted email summary via Nodemailer
Why Puppeteer instead of a plain HTTP client? Modern dashboards are usually JavaScript-rendered single-page apps — the numbers you want don’t exist in the initial HTML response. A headless browser executes the page’s JavaScript exactly like a real user’s browser, so whatever a human can see, your script can extract.
Set up the project:
mkdir dashboard-reporter && cd dashboard-reporter
npm init -y
npm install puppeteer nodemailer dotenv
Keep all credentials in a .env file (and out of version control):
DASHBOARD_URL=https://internal.example.com/login
DASHBOARD_USER=reporting-bot@example.com
DASHBOARD_PASS=your-password-here
SMTP_HOST=smtp.example.com
SMTP_USER=reports@example.com
SMTP_PASS=your-smtp-password
REPORT_RECIPIENTS=team@example.com
How to Scrape an Internal Dashboard Using Puppeteer and Node.js
Handling Authentication and Logins
Most internal dashboards sit behind a login form. The pattern to scrape an internal dashboard behind auth is: navigate to the login page, fill the form, submit, and wait for the post-login navigation to complete.
require('dotenv').config();
const puppeteer = require('puppeteer');

async function login(page) {
  await page.goto(process.env.DASHBOARD_URL, { waitUntil: 'networkidle2' });

  await page.type('#email', process.env.DASHBOARD_USER);
  await page.type('#password', process.env.DASHBOARD_PASS);

  await Promise.all([
    page.click('button[type="submit"]'),
    page.waitForNavigation({ waitUntil: 'networkidle2' }),
  ]);

  // Verify login actually succeeded — don't assume
  if (page.url().includes('/login')) {
    throw new Error('Login failed: still on login page. Check credentials.');
  }
}
Practical tips for authentication:
- Use a dedicated service account for the scraper, not a personal login, so audits are clean and password rotations are controlled.
- Verify success explicitly. Check the post-login URL or wait for an element that only exists when logged in. Silent auth failures are the #1 cause of empty reports.
- Reuse sessions where possible. Persisting cookies with
page.cookies()between runs avoids hammering the login endpoint. If the dashboard uses SSO or MFA, you may need a session-cookie approach or an app-specific credential.
Extracting Data from the Dashboard
Once authenticated, navigate to the report view and pull the values. The critical habit with a puppeteer scrape dashboard nodejs workflow is to wait for the data, not the page — SPAs finish “loading” long before their numbers render.
async function extractMetrics(page) {
  await page.goto('https://internal.example.com/analytics', {
    waitUntil: 'networkidle2',
  });

  // Wait for the specific element that holds real data
  await page.waitForSelector('.metric-card__value', { timeout: 30000 });

  return page.evaluate(() => {
    const cards = document.querySelectorAll('.metric-card');
    return Array.from(cards).map((card) => ({
      label: card.querySelector('.metric-card__label')?.textContent.trim(),
      value: card.querySelector('.metric-card__value')?.textContent.trim(),
    }));
  });
}

Visual representation of a Puppeteer script in action, demonstrating the extraction of key metrics from a dashboard for automated internal reporting.
Hardening tips:
- Prefer stable selectors — IDs or
data-*attributes over brittle class chains that break with every UI tweak. - Validate what you scraped. If a metric comes back empty or non-numeric, fail loudly instead of emailing a blank report.
- Screenshot on failure.
await page.screenshot({ path: 'error.png' })in your catch block turns “it broke somehow” into a five-second diagnosis.
How to Automate Sending Email Summary Reports in Node.js
With data in hand, Nodemailer handles delivery. This is the heart of nodejs send email summary automation:
const nodemailer = require('nodemailer');

async function sendReport(metrics) {
  const transporter = nodemailer.createTransport({
    host: process.env.SMTP_HOST,
    port: 587,
    secure: false,
    auth: { user: process.env.SMTP_USER, pass: process.env.SMTP_PASS },
  });

  const rows = metrics
    .map((m) => `<tr><td style="padding:8px 16px;">${m.label}</td>
                 <td style="padding:8px 16px;"><strong>${m.value}</strong></td></tr>`)
    .join('');

  await transporter.sendMail({
    from: '"Daily Reports" <reports@example.com>',
    to: process.env.REPORT_RECIPIENTS,
    subject: `Dashboard Summary — ${new Date().toLocaleDateString()}`,
    html: `<h2>Daily Dashboard Summary</h2>
           <table border="0" cellspacing="0">${rows}</table>
           <p style="color:#888;">Generated automatically at ${new Date().toISOString()}</p>`,
    text: metrics.map((m) => `${m.label}: ${m.value}`).join('\n'),
  });
}
Formatting Data for Email Deliverability
A report nobody receives (or nobody can read) is worthless. To keep your automated summaries landing in inboxes:
- Always include a plain-text alternative alongside HTML — it improves spam scoring and accessibility.
- Use simple, inline-styled HTML tables. Email clients have inconsistent CSS support; keep layout primitive.
- Send from an authenticated domain with SPF/DKIM configured, and use a consistent from-address.
- Keep subject lines informative and dated (e.g., “Dashboard Summary — 2026-07-25”) so reports are searchable later.
- Don’t attach huge files. If you need full data, link to a stored CSV rather than attaching multi-megabyte payloads.
For richer reports, you can even integrate AI via Claude API to turn raw scraped metrics into a short natural-language summary paragraph at the top of the email — “revenue up, churn flat, two anomalies worth checking” is more useful at 7 AM than a wall of numbers.
Scheduling and Deploying the Automation
Tie the pieces together in a single entry point with proper cleanup and error handling:
async function main() {
  const browser = await puppeteer.launch({ headless: 'new' });
  const page = await browser.newPage();
  try {
    await login(page);
    const metrics = await extractMetrics(page);
    await sendReport(metrics);
    console.log('Report sent successfully');
  } catch (err) {
    await page.screenshot({ path: `failure-${Date.now()}.png` });
    console.error('Report failed:', err.message);
    process.exitCode = 1;
  } finally {
    await browser.close();
  }
}

main();
To run this every morning, you’ll want to schedule tasks reliably — with wall-clock scheduling, overlap guards, and logging — rather than a bare setInterval. Deployment considerations:
- Run headless on a server or container. Puppeteer needs its bundled Chromium’s system dependencies installed in your image.
- Alert on failure. A morning report that silently stops is worse than one that visibly errors; send failure notifications to the same channel as the report.
- Log every run with timestamps and outcome so you can audit gaps.
This scraper-to-email pattern is one building block of a broader Node.js automation setup — the same structure (authenticate, extract, transform, deliver, schedule) applies to dozens of internal tooling problems.
FAQ
Can Puppeteer scrape a dashboard that requires login?
Yes. Puppeteer can fill and submit login forms, wait for post-login navigation, and persist session cookies between runs. Use a dedicated service account and verify login success explicitly before scraping.
How do I scrape a dashboard that loads data with JavaScript?
Use page.waitForSelector() on the element that contains the actual data before extracting. JavaScript-rendered dashboards finish “loading” the page shell before the numbers appear, so waiting for navigation alone isn’t enough.
What’s the best way to email scraped data in Node.js?
Nodemailer with an authenticated SMTP account is the standard approach. Send both HTML (simple inline-styled tables) and a plain-text alternative, and configure SPF/DKIM on your sending domain for deliverability.
How often can I run a dashboard scraper?
Match the frequency to how often the data changes and keep load reasonable — for most internal reporting, one run per day or per hour is plenty. Reuse sessions where possible to avoid repeated logins.
Is it legal to scrape an internal dashboard?
Scraping systems you own or are explicitly authorized to access for internal automation is generally acceptable, but third-party tools may prohibit automated access in their terms of service. Always prefer an official API when available and review the relevant terms — this article is not legal advice.